
The integration of Bluetooth with Arduino is one of the most powerful ways to introduce wireless communication in embedded systems and DIY electronics. From remote-controlled robots to home automation systems, the possibilities are endless when these two technologies work together.
In this blog, we will explore the concept, components, setup, coding, and applications involved in creating Bluetooth-based Arduino projects.
What is Bluetooth?
Bluetooth is a short-range wireless communication protocol that enables devices to exchange data over distances typically ranging from 10 to 100 meters. It operates in the 2.4 GHz ISM band and supports both point-to-point and point-to-multipoint topologies.
Key features of Bluetooth include:
Low power consumption
Reliable data transmission
Compatibility with mobile devices
Minimal wiring required
Why Use Bluetooth with Arduino?
Interfacing Bluetooth with Arduino provides the following advantages:
Wireless Control: Replace wired input/output systems with mobile or PC-based control.
IoT Ready: Serves as a basic wireless communication method for IoT applications.
Ease of Integration: Works seamlessly with Arduino’s UART (Serial) interface.
Low Cost: Bluetooth modules like HC-05 and HC-06 are inexpensive and easily available.
Popular Bluetooth Modules for Arduino
Let’s look at the most widely used modules in hobby electronics:
HC-05 Module (Master/Slave):
Works in both Master and Slave modes.
Default baud rate: 9600 or 38400
Can initiate or accept connections.
Configurable using AT commands.
HC-06 Module (Slave Only):
Works only in Slave mode
Simplified version of HC-05.
Ideal for one-way communication (mobile-to-Arduino).
Not configurable for master-slave role switching.
Both modules communicate via UART protocol (TX and RX) and operate on 3.3V logic, though they are often powered by 5V through onboard regulators.
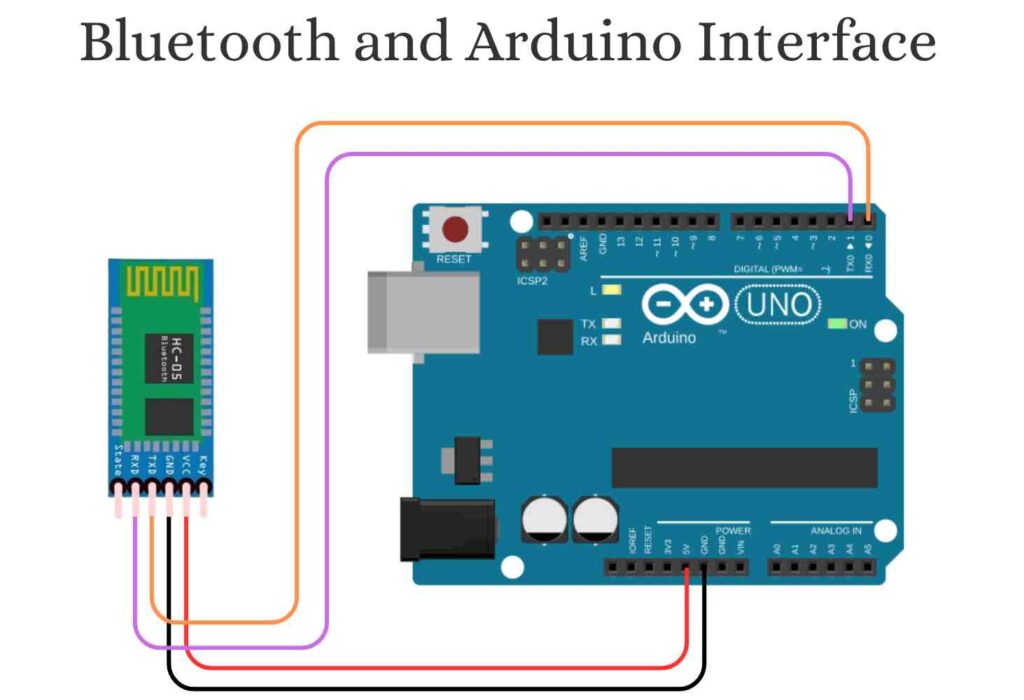
Wiring Diagram: HC-05 to Arduino UNO
| HC-05 Pin | Arduino Pin | Description |
|---|---|---|
| VCC | 5V | Power supply |
| GND | GND | Ground |
| TXD | RX (Pin 0) | Transmit data to Arduino |
| RXD | TX (Pin 1)* | Receive data from Arduino (via logic divider) |
Important: Since Arduino operates on 5V logic and HC-05 on 3.3V, you must use a voltage divider or logic level shifter on the TX pin to avoid damaging the Bluetooth module.
Interfacing Code: Bluetooth Control of LED
char receivedChar;
int ledPin = 13;

void setup() {
  pinMode(ledPin, OUTPUT);
  Serial.begin(9600);  // Match HC-05's baud rate
}

void loop() {
  if (Serial.available()) {
    receivedChar = Serial.read();

    if (receivedChar == '1') {
      digitalWrite(ledPin, HIGH);  // Turn ON LED
    } else if (receivedChar == '0') {
      digitalWrite(ledPin, LOW);   // Turn OFF LED
    }
  }
}
Testing Procedure:
Upload the code to Arduino.
Pair your smartphone with HC-05 (password: 1234 or 0000).
Open any Bluetooth Terminal App on your mobile.
Connect to the HC-05 module.
Send 1 to turn ON the LED, 0 to turn it OFF.
Real-Time Applications Using Bluetooth and Arduino
Here are a few practical use cases:
1. Home Automation:
Use mobile apps to control lights, fans, doors, and appliances wirelessly.
2. RC Cars and Drones:
Design remote-controlled robots or cars using phone-based input.
3. Health Monitoring:
Transmit vital sensor data (heart rate, temperature) wirelessly to smartphones.
4. Access Control:
Bluetooth-based door lock systems can validate users via smartphone.
5. Data Logging:
Send sensor data to a mobile phone or PC without needing an SD card or USB.
Tips for Beginners
Avoid using Arduino’s Serial Monitor while Bluetooth is connected to hardware TX/RX (use
SoftwareSerialinstead).Always match baud rates between Arduino and Bluetooth modules.
Check if the LED on the module blinks fast (not connected) or slow (connected).
Use AT Commands to configure HC-05 for custom roles, names, and PINs.
AT Commands for HC-05 (Optional Advanced Usage)
To use AT commands, press and hold the button on the HC-05 while powering it up. The module enters AT Command Mode.
| Command | Function |
|---|---|
AT | Check if working |
AT+NAME=MyDevice | Set module name |
AT+PSWD=4321 | Set pairing password |
AT+ROLE=0 | Set as Slave |
AT+ROLE=1 | Set as Master |
Bluetooth is a perfect entry point into the world of wireless communication. With just a few lines of code and simple wiring, you can create robust wireless applications using Arduino. From basic LED control to full-fledged smart automation systems, Bluetooth modules like HC-05 offer flexibility, ease of use, and budget-friendliness.
Whether you’re a student, hobbyist, or prototyping an IoT product, mastering Bluetooth and Arduino interfacing is an essential skill on your tech journey.
Need Help?
Let us know in the comments or reach out if you’d like help building a Bluetooth project.
About pluntx

Pluntx is India’s leading platform for electronics and 3D printing solutions, offering a wide range of products like Arduino, Raspberry Pi, drone parts, sensors, 3D printer components, and more. We also provide expert CAD design services and affordable 3D printing, starting at just ₹49. Click here to explore our extensive collection of electronics and prototyping tools. Be sure to follow us on Instagram and YouTube, where we regularly share tutorials, tips, and updates on everything from Arduino projects to drone technology. Pluntx delivers precision and quality. Our mission is to empower creativity through technology and simplify the journey from concept to creation.