The Wheatstone Bridge may look like a simple diamond-shaped resistor network, but it’s a foundational tool in both analog electronics and modern sensor systems. Whether you’re a student exploring the principles of measurement or an engineer working on sensor interfaces, mastering the Wheatstone Bridge gives you a powerful edge. Let’s unravel how this 19th-century invention continues to thrive in 21st-century technology.
A Wheatstone Bridge is an electrical circuit used to accurately measure an unknown resistance by balancing two legs of a bridge circuit. It is widely used in sensor applications, including strain gauges, temperature sensors, and pressure transducers, due to its ability to detect small changes in resistance. The circuit operates by comparing voltage drops across known and unknown resistors, and when balanced, the output voltage is zero. This makes it ideal for precision measurement in electronics, instrumentation, and IoT system
1. A Bit of History — Why is it Called the Wheatstone Bridge?
Although named after Sir Charles Wheatstone, the bridge was actually invented by Samuel Hunter Christie in 1833. Wheatstone popularized it in 1843 to measure unknown electrical resistances with great precision, which is why the circuit took on his name.
Fast forward to today, the core idea is the same — comparing voltage drops to detect imbalances — but now applied in everything from robots to wearables.
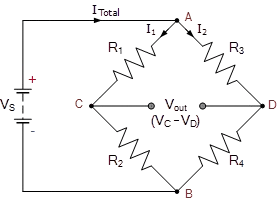
2. Anatomy of the Bridge Circuit
A standard Wheatstone Bridge is made of four resistors connected in a diamond shape.
Components:
R1, R2, R3 – Known resistors
Rx – Unknown resistor (or a variable sensor)
Vs – Voltage supply
Vg – Voltmeter (or a differential amplifier)
Formula for a Balanced Bridge:
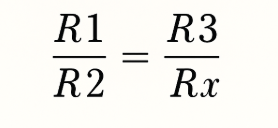
If this condition is satisfied, Vg = 0, and the bridge is perfectly balanced. Any slight deviation from this condition creates a measurable voltage across the bridge center — and that’s the key to its sensing capabilities.
Output Voltage Formula (Unbalanced Bridge):
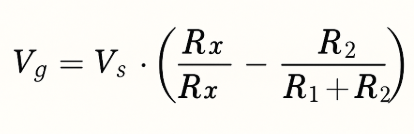
This formula lets you calculate how the bridge responds to changes — such as when a sensor element changes resistance due to strain, pressure, or temperature.
3. Why Use a Wheatstone Bridge?
Here’s why engineers prefer this circuit for precision measurement:
| Feature | Advantage |
|---|---|
| High Sensitivity | Detects small resistance variations (micro-ohms!) |
| Noise Immunity | Differential measurement cancels common-mode noise |
| Easy Integration | Works with analog or digital amplifiers |
| Versatile Sensor Support | Ideal for strain, temperature, pressure, and more |
4. Applications That Depend on Wheatstone Bridges
A. Strain Gauges – Detecting Deformation
When materials stretch or compress, the attached strain gauge undergoes resistance change. Used inside a bridge, these changes can be detected accurately.
Real-World Use:
Load cells (weighing scales)
Bridge deformation monitors
Biomechanical force measurement
B. Temperature Sensors – RTDs and Thermistors
Temperature-sensitive resistors (like RTDs) change resistance with thermal variation. The bridge allows measurement of tiny thermal shifts — crucial in industrial and laboratory setups.
Real-World Use:
Medical thermometers
Engine temperature monitoring
Climate-controlled chambers
C. Pressure Transducers
MEMS-based pressure sensors often have a Wheatstone Bridge integrated directly into their silicon structure.
Real-World Use:
Barometers
Aircraft cabin pressure control
Industrial pneumatic systems
D. Automotive Systems
Automobiles are filled with sensors wired into bridges — especially for real-time diagnostics.
Examples:
Tire Pressure Monitoring (TPMS)
Suspension load monitoring
Steering torque sensing
E. Medical Monitoring Devices
High-precision bridge circuits are used in:
ECG/EMG systems
Blood pressure monitors
Smart prosthetics with pressure feedback
5. Instrumentation Amplifier: Making Signals Usable
The bridge’s output voltage is tiny — often in millivolts or microvolts. To use this in embedded systems, the signal is first passed through an Instrumentation Amplifier like INA128 or AD620.

6. Types of Wheatstone Bridge Configurations
Quarter Bridge – 1 active sensor, 3 fixed resistors
Half Bridge – 2 active sensors (better temperature compensation)
Full Bridge – All 4 arms have sensors; highest sensitivity and linearity
7. Real-Life Engineering Example
Digital Weighing Machine (Load Cell)
Strain gauges are embedded in a metal body
Pressure changes strain → strain changes resistance
Bridge output voltage changes
Amplifier boosts signal
Microcontroller calculates weight and displays it
| This exact setup is used in your grocery store scale and high-precision lab balances.
8. Educational Perspective: Lab Experiments
Wheatstone Bridges are featured in:
Electrical measurements labs
Instrumentation systems courses
Arduino-based sensor projects
Try this at home:
Build a bridge on a breadboard
Use an LDR or thermistor as Rx
Measure and graph the output voltage as light/temperature changes
9. Limitations
| Limitation | Description |
|---|---|
| Requires Calibration | Must balance bridge for accuracy |
| Sensitive to Temp | May need compensation circuits |
| Amplification Needed | Output signal is weak by itself |
10. Modern-Day Use Cases
| Industry | Device/System |
|---|---|
| Aerospace | Cabin pressure sensors, wing load tests |
| Industrial | Robotic arm torque feedback |
| Biomedical | Smart prosthetics, fetal monitoring |
| IoT & Wearables | Foot pressure sensors in smart shoes |
| Civil Engineering | Bridge load monitoring, structural cracks |
About pluntx

Pluntx is India’s leading platform for electronics and 3D printing solutions, offering a wide range of products like Arduino, Raspberry Pi, drone parts, sensors, 3D printer components, and more. We also provide expert CAD design services and affordable 3D printing, starting at just ₹49. Click here to explore our extensive collection of electronics and prototyping tools. Be sure to follow us on Instagram and YouTube, where we regularly share tutorials, tips, and updates on everything from Arduino projects to drone technology. Pluntx delivers precision and quality. Our mission is to empower creativity through technology and simplify the journey from concept to creation.